Pets, Plants, and Computer Vision
Header

Simple Steganography

February 16th, 2013 | Posted by admin in code | computer vision | demo | Fun! | pics or it didn't happen | steganography - (Comments Off on Simple Steganography)

I had a moment to play with steganography while I was watching tv tonight. Steganography is a way of encoding text messages inside image files in such a way that they don’t alter the original image content. I came across this nice little tutorial using the stepic python library. I was able to get Stepic working with and hooked into SimpleCV with only a little bit of massaging (needed to turn SimpleCV Image to a PIL Image and back again). Here is the actual commit.

The Source Image

The Source Image


The encoded Image.

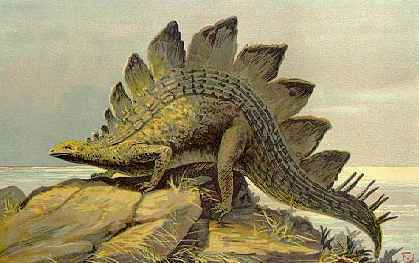
This dinosaur has an encoded message, can you find it?.

I wrote a little bit of code to test my work and to see if I could tease out the algorithm. Basically all I did was encode a message, in this case the wikipedia entry on stegosaurs, into an image and then subtracted that image from the original imaage to create a diff. To the naked eye both the source image and the encoded image look the same. The diff also looks as it should, that is to say all black. To dig a bit deeper I applied a histogram equalization function to stretch out the images’s dynamic range. Bingo, the encoding scheme is clearly visible.

The pixelwise difference between the source and encoded image.

The pixelwise difference between the source and encoded image.

The difference between the source and encode information using an equalize operation.

The difference between the source and encode information using an equalize operation.

The next step is to look at the individual color channels to see if they are holding on to any information. I could look at the actual algorithm in the source, but that would be no fun. It would be interesting to see if I could build a heuristic for determining which images have encoded data. I would also be useful to add AES encryption to the encode/decode calls in SimpleCV.

As a side note I tried to decode my image using this on-line utility but I had no luck. My guess is there are incompatibilities between the stable 0.3 release of the stepic library and the development 0.4 release that might be on the utility.

Crawl, Walk, Drive

February 14th, 2013 | Posted by admin in Ann Arbor | automation | Automation Alley | C++ | code | demo | FIRST | Maker Works | pics or it didn't happen | robots - (Comments Off on Crawl, Walk, Drive)

We finally got the FIRST Team 830 drive train up an running. We still have a lot of hardware to attach, but this is a good start. currently the control system and battery are just loosely attached with cable ties. This will change once we get the final build-out of the pickup and firing mechanism. We have yet to test the pneumatic gear shifters or a PID controller so in these videos the robot is in low gear and capped at seventy percent power.

This is the first run of the robot.

Once we got used to the control I slipped my cell-phone in a spare cRIO slot and got some video.

I have a few screen captures of our current design that gives the programming team a better idea of what other subsystems we need to code and design controls for. Unfortunately I don’t have a nice overview image of the final cad design.

Slight Overview

Disc Shooter

Pickup

Drive Train

Elevator

I have a few screen captures of our current design that gives the programming team a better idea of what other subsystems we need to code and design controls for. Unfortunately I don’t have a nice overview image of the final cad design.

We are down to the final week before bag and tag. Hopefully I will have more cool videos soon.

FRC 830 Drive Train First Run

February 10th, 2013 | Posted by admin in Ann Arbor | automation | Automation Alley | code | demo | FIRST | Maker Works | Michigan | pics or it didn't happen | robots - (Comments Off on FRC 830 Drive Train First Run)

It took a lot of work, but we finally have a working drive train and shooter. Now we just need to put the two together, add the pickup mechanism, and we are ready for competition.

Perler Bead Project

July 2nd, 2012 | Posted by admin in code | computer vision | domestic life | Fun! | Uncategorized - (Comments Off on Perler Bead Project)

So I had to run to Jo-Ann fabric for a few odds and ends. My Mom gave me a couple of 50% off coupons and on a whim I purchased some perler beads and a tray for about $10. Perler beads are this kids craft where you patiently place little plastic beads on tray and then fuse them using an iron to create various toys. I am pretty sure that the beads themselves are just a ruse by the vacuum cleaner companies to sell more powerful vacuums.

Perler Beads

Perler Bead Set

I wanted to see if I could use SimpleCV to map images to  pearler bead colors to create little coasters from my photos. I took the beads and created a square calibration grid so I could pull out the colors. I then quantized the image to a palette and saved the results.

This is what the calibration grid looks like when I quantize it to have 16 colors (note that this result is not repeatable because of the k-means calculation’s initial conditions).

To test my approach I used an input image (in this case Lena), pixelized the image to match the perler bead grid, and then re-applied the quantization to the pixelized image. The results are not that great.

Image pipeline, input, pixelized image (17×17 block size), and quantized result.

There are about five colors in the output image and it seems to lose a lot of its information. I did some digging and found that two things seem to be going on. First, the quantization step seems to have some bad initial conditions. This is to say that I take the image and try to cluster the colors in it into 16 groups using k-means. If the algorithm starts with a bad initial condition a lot of the clusters “run into one another” and I end up with less than 16 color groups. The other problem is subtler and has to do with image dithering. I anticipated that this might be a problem because gif images also use a quantized color palette (for gifs it is 256 colors) to compress the image size. Back in the old days of the web you would use a technique called dithering as part of your gif compression algorithms to make photographs look more realistic. Generally dithering is used to lessen the effect of quantization error around gradients. To illustrate this I found an image on wikipedia with a lot of colors and color gradients, here is what would come out of the naive SimpleCV quantization (top is input, bottom is output using img.palettize(bins=256)):

Quantization makes things look weird. The top is the input image and the bottom is the image quantized to only have 256 colors (just like a normal GIF image).

Now here is the same result using ImageMagick with GIF dithering turned on (specifically the command: convert test.jpg -dither Riemersma -colors 256 test.gif).

Still 256 colors, but the dithering makes the gradients around the lights less apparent.

As you can see the dithered images look way better. The effect seems to hold even when I shrink the number of colors down to 16 but still use dithering. In the two images below the top is the output from SimpleCV quantizing to 16 colors, while the bottom is ImageMagick result with added dithering (note that there may be some re-compression artifacts from when I saved the image).

Top is SimpleCV’s output when I quantize the image to have 16 colors, while the bottom image is ImageMagicks results with 16 colors and dithering.

Hopefully in the next week or two I can read up on dithering algorithms and see if I can’t add a few to SimpleCV.